
Monday, August 2, 2010
Project #2 - Sneak Preview
These are the fabrics for Project #2. I'm excited. But need to simmer down until the weekend or next week before I do another. Have other things I need to do!

John Deere Dress - Take 2
Last night my "angel" was sick. And I got it. But having to stick close to home I did a revised dress for her that she actually seems to like. It fits better too. See the pics below. I also left out the elastic, and it makes for a softer neckline. Maybe I'm using too thick of elastic. I'm not sure.
Even though it fits better and she seems to like it, I think the ribbons bother her... I need to learn how to feed them through so they tie in the back. I think they get tangled in her long hair - even in a pony tail. She wore it for a short while and then asked to change.


Even though it fits better and she seems to like it, I think the ribbons bother her... I need to learn how to feed them through so they tie in the back. I think they get tangled in her long hair - even in a pony tail. She wore it for a short while and then asked to change.


Sunday, August 1, 2010
Project #1: John Deere Pillowcase-Style Dress
I started and completed my first project today. Not too bad for a novice, huh? Well, keep reading and then make up your mind!
After browsing Etsy for custom dresses for my daughter, I kept seeing these cute easy-flowing dresses tied with ribbons at the top. Someone on a message board I chat on shared with me that they were pillowcase dresses and so easy to sew, even for a novice. My mom is a talented quilter and gave me one of her sewing machines, so I decided I might as well see how hard this whole pillowcase dress thing really is. I didn't have or find any pillowcases I'd want to sew into a dress, so instead I went fabric shopping. I bought 3 sets of fabrics for progessively harder projects. Project #1 was my simplest project. Supposedly.
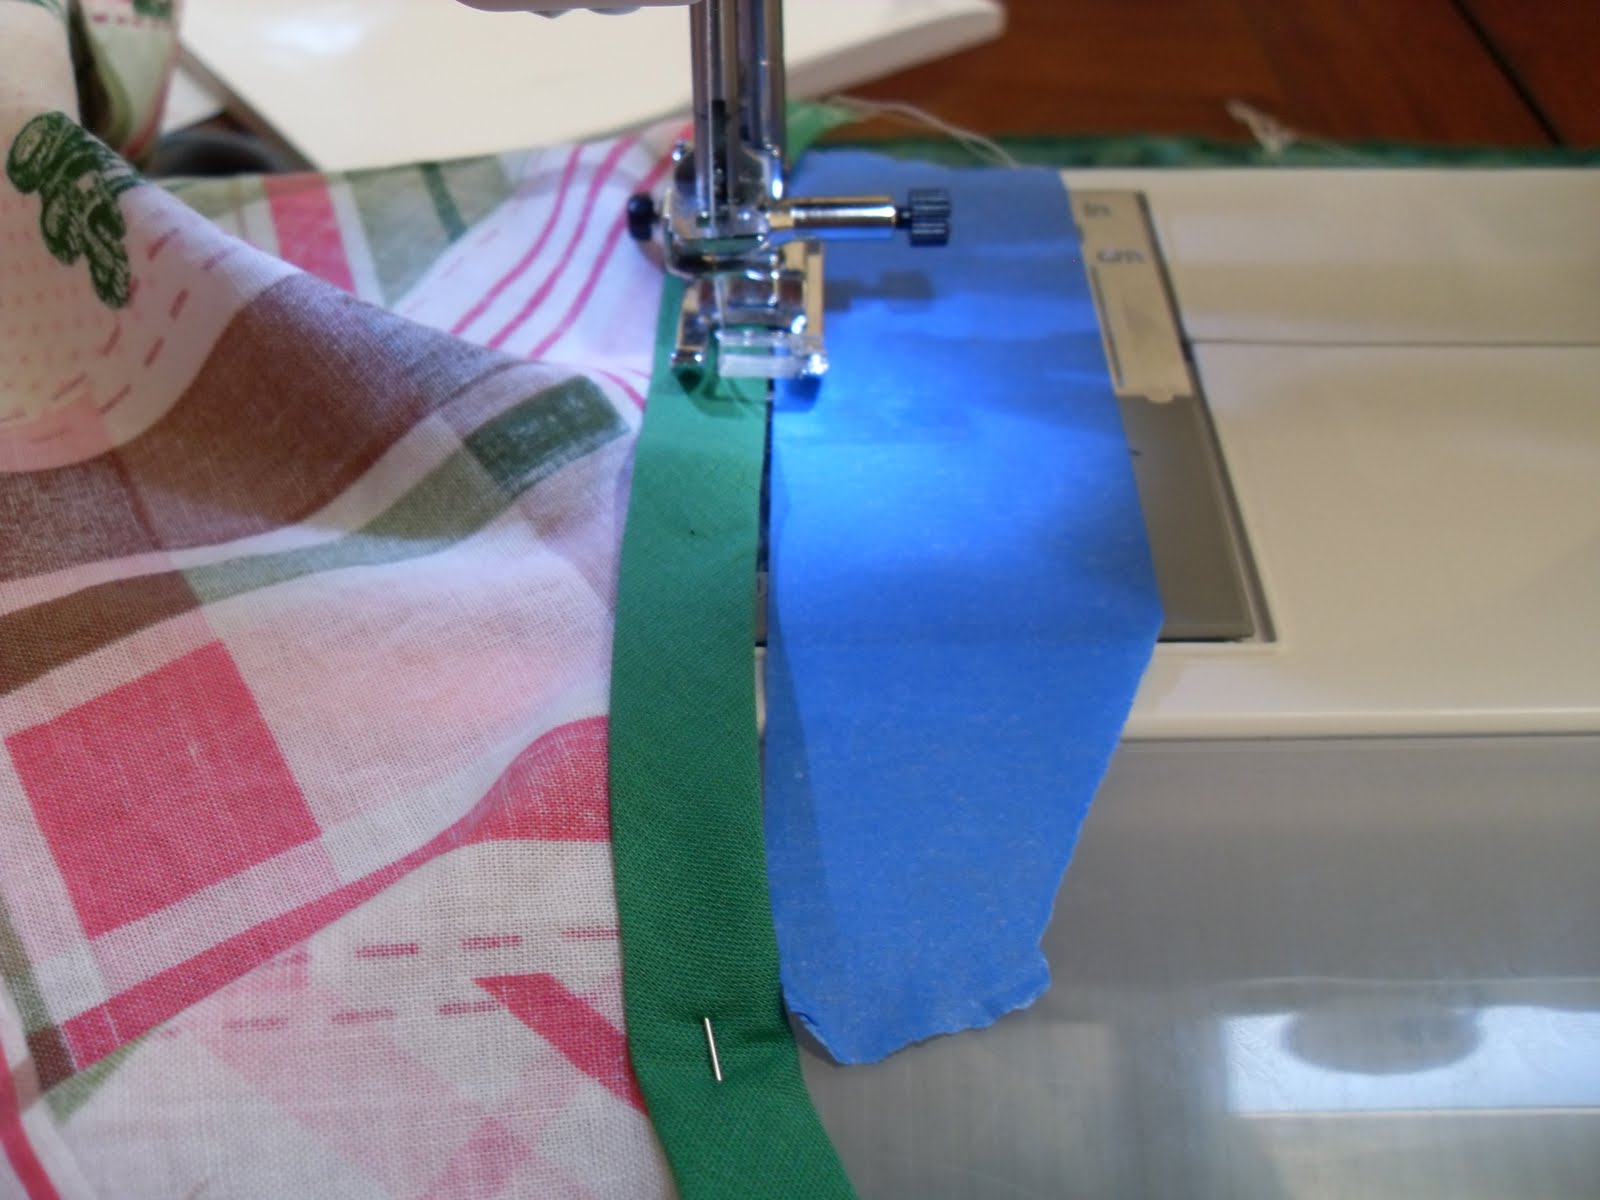
Starting out: The first thing I did was wash the fabric. It is a cute pink and green patchwork style fabric featuring John Deere tractors and logos. My husband is a country boy at heart and I figured he'd enjoy seeing her in this little dress. And at the rodeo this year her favorite song was "Big Green Tractor." so there you go. Once I got the fabric from the dryer, I lined up the salvages (I think that is the term) and began to create a hem for the bottom of my pillow case dress.

I think I did a decent job sewing a straight line, if I do say so myself (thanks Mom for the tip on using tape to guide your fabric - it saved the day!!):

Then I sewed the salvage edges together. I didn't measure or trim down the fabric - the width actually measured up against a standard pillowcase fairly well, and that was the design I was going for. With this being my first project, it was also more about learning how stitches work and some basics of sewing before trying to do any serious patterns or detailed measurements.

Then I measured 25" of fabric. From my daughter's collar bone to below her knee is 23" and I added 2 inches for play at the neckline. And here you go (below). Looks like a pillowcase, right? I’m going to keep going, but part of me thinks I should have just stopped here while I was ahead.

Next I cut the sleeves. I measured 5 inches down the long side and 2 inches in and created a soft curve for an arm hole. I folded the fabric in half down the middle and cut the shapes for the arms. I forgot to take a picture of that part, but it wasn't that exciting, really. Then I started the binding. I think I was so into the merging of fabrics with the miracle of sewing machine stitches that I stopped thinking about what I was doing. As a result, I sewed up one arm with binding, lol! Here is a picture of what I pulled away, requiring I cut an extra 1/4" of armhole on both sides to make up for the edge of fabric I ruined as I ripped the binding off:

So then I had my wits about me and I pinned on double sided binding along one of the armholes.

Next, I stitched in place. Easy peasy, right?

Gorgeous and easy, right?

WRONG:

I didn't get all the fabric up into the binding. Argggghhhhh! To fix it I ended up having to trim the binding, cut a piece for that section, and sew it in place. This is how I learned you can create an "ugly" or "back" side of your outfit if you didn't already have one! It also taught me I should invest in some transparent/clear thread for all binding. Oh well, the second armhole didn't turn out too badly. I hope with practice I continue to get better!

So here is a picture of the "pillowcase" dress with a straight hem at the bottom and two armholes with binding - for better or for worse!

Next came the elastic. I don't think the YouTube video I used for instruction included this, but a website I referenced did. The elastic supposedly helps the garment flex as your child grows. And it gives structure to the top to prevent a choking hazard. But here is the thing: Elastic is a BENCH (not a bench - read between the lines) to sew! Pinning it and holding it stretched between pins so the fabric gathers correctly is definitely something that will take some practice! Here is a picture of the front of the dress's elastic:

Cute, right? Well, not exactly. The step I should have left out until after sewing the elastic in, but didn't was to create a fold-over at the top about 1" wide so the ribbon can be strewn through to connect the sides over the shoulders. I sewed that in place BEFORE the elastic. So I was stuck adding the elastic on the inside where it could be scratchy or irritating on my little angel:

I also forgot you are supposed to sew elastic on with a zig-zag stitch (at least that is what the book says) so I didn't do it on the front, but did on the back. I actually like the gathering on the front better than this, although this forgives an uneven stitch better than a straight stitch:

But then when I did the zigzag stitch, I had trouble holding the elastic all the way to the end so I came up short on the edge:

So that is something I will see if I can correct on the next one - perhaps cutting the elastic a little long so I have a bit to hold onto while I thread it through the machine, and then cutting the extra off... Any seamstresses have any advice for me on this one? Next, I threaded the ribbon through the opening I had created at the top of the dress. A little tip I learned online was very handy - pin the end of the ribbon with a safety pin and work the pin through the little space created in the hem and it goes through very easily!


Now one thing I learned on another site was to stitch the ribbon in place to prevent a choking hazard. I did that, but I don't think it actually did any favors for the dress, so I need to find some more tips on this. It just made it look messy.

Maybe the elastic is enough? Or maybe only secure it on one end and not both? Of course I think that would make it hang funny. I'll try to figure it out on the next project. Here is a picture of the finished project, hanging on a hanger, waiting for my daughter to wake up from her nap so she could try it on.

Project 1 on the Hanger = WIN!
And now the true test - does my daughter like it? What do you think?


Project 1 as judged by the model herself = FAIL.
But at least she doesn't want it to go in the trash. I interviewed her to get her opinion on this new dress. Sigh... I couldn't even get her to say "Good try Mommy!" LOL!
So what went wrong?
I measured 23 inches for length and it ended up being 23-1/2" long. Too long for her taste, but I kept reminding her she wouldn't have to wear bloomers under it. The fact that it was 19" wide was really the problem - she felt like she was wearing a pillowcase, and it didn't feel cute. I did ask her if she wanted me to give it away. At first she said she wanted me to give it to Abby (our goddaughter) because she is a bigger girl. Then she said she wanted to keep it in her room until she was bigger. So maybe it's not a TOTAL fail after all. Or maybe she saw my face sink when she started crying with it on and is compassionnate enough already that she doesn't want to hurt my feelings... stay tuned. We'll only know for sure next year when I try to get her to try it on again!
So there you have it. My first experience. Everything I did was based on my memory of directions from this YouTube video and other web-based instructions. I recommend you follow the YouTube video for a more satisfied customer than my daughter!
After browsing Etsy for custom dresses for my daughter, I kept seeing these cute easy-flowing dresses tied with ribbons at the top. Someone on a message board I chat on shared with me that they were pillowcase dresses and so easy to sew, even for a novice. My mom is a talented quilter and gave me one of her sewing machines, so I decided I might as well see how hard this whole pillowcase dress thing really is. I didn't have or find any pillowcases I'd want to sew into a dress, so instead I went fabric shopping. I bought 3 sets of fabrics for progessively harder projects. Project #1 was my simplest project. Supposedly.
Starting out: The first thing I did was wash the fabric. It is a cute pink and green patchwork style fabric featuring John Deere tractors and logos. My husband is a country boy at heart and I figured he'd enjoy seeing her in this little dress. And at the rodeo this year her favorite song was "Big Green Tractor." so there you go. Once I got the fabric from the dryer, I lined up the salvages (I think that is the term) and began to create a hem for the bottom of my pillow case dress.

I think I did a decent job sewing a straight line, if I do say so myself (thanks Mom for the tip on using tape to guide your fabric - it saved the day!!):

Then I sewed the salvage edges together. I didn't measure or trim down the fabric - the width actually measured up against a standard pillowcase fairly well, and that was the design I was going for. With this being my first project, it was also more about learning how stitches work and some basics of sewing before trying to do any serious patterns or detailed measurements.

Then I measured 25" of fabric. From my daughter's collar bone to below her knee is 23" and I added 2 inches for play at the neckline. And here you go (below). Looks like a pillowcase, right? I’m going to keep going, but part of me thinks I should have just stopped here while I was ahead.

Next I cut the sleeves. I measured 5 inches down the long side and 2 inches in and created a soft curve for an arm hole. I folded the fabric in half down the middle and cut the shapes for the arms. I forgot to take a picture of that part, but it wasn't that exciting, really. Then I started the binding. I think I was so into the merging of fabrics with the miracle of sewing machine stitches that I stopped thinking about what I was doing. As a result, I sewed up one arm with binding, lol! Here is a picture of what I pulled away, requiring I cut an extra 1/4" of armhole on both sides to make up for the edge of fabric I ruined as I ripped the binding off:

So then I had my wits about me and I pinned on double sided binding along one of the armholes.

Next, I stitched in place. Easy peasy, right?
Gorgeous and easy, right?

WRONG:

I didn't get all the fabric up into the binding. Argggghhhhh! To fix it I ended up having to trim the binding, cut a piece for that section, and sew it in place. This is how I learned you can create an "ugly" or "back" side of your outfit if you didn't already have one! It also taught me I should invest in some transparent/clear thread for all binding. Oh well, the second armhole didn't turn out too badly. I hope with practice I continue to get better!

So here is a picture of the "pillowcase" dress with a straight hem at the bottom and two armholes with binding - for better or for worse!

Next came the elastic. I don't think the YouTube video I used for instruction included this, but a website I referenced did. The elastic supposedly helps the garment flex as your child grows. And it gives structure to the top to prevent a choking hazard. But here is the thing: Elastic is a BENCH (not a bench - read between the lines) to sew! Pinning it and holding it stretched between pins so the fabric gathers correctly is definitely something that will take some practice! Here is a picture of the front of the dress's elastic:

Cute, right? Well, not exactly. The step I should have left out until after sewing the elastic in, but didn't was to create a fold-over at the top about 1" wide so the ribbon can be strewn through to connect the sides over the shoulders. I sewed that in place BEFORE the elastic. So I was stuck adding the elastic on the inside where it could be scratchy or irritating on my little angel:

I also forgot you are supposed to sew elastic on with a zig-zag stitch (at least that is what the book says) so I didn't do it on the front, but did on the back. I actually like the gathering on the front better than this, although this forgives an uneven stitch better than a straight stitch:

But then when I did the zigzag stitch, I had trouble holding the elastic all the way to the end so I came up short on the edge:

So that is something I will see if I can correct on the next one - perhaps cutting the elastic a little long so I have a bit to hold onto while I thread it through the machine, and then cutting the extra off... Any seamstresses have any advice for me on this one? Next, I threaded the ribbon through the opening I had created at the top of the dress. A little tip I learned online was very handy - pin the end of the ribbon with a safety pin and work the pin through the little space created in the hem and it goes through very easily!


Now one thing I learned on another site was to stitch the ribbon in place to prevent a choking hazard. I did that, but I don't think it actually did any favors for the dress, so I need to find some more tips on this. It just made it look messy.

Maybe the elastic is enough? Or maybe only secure it on one end and not both? Of course I think that would make it hang funny. I'll try to figure it out on the next project. Here is a picture of the finished project, hanging on a hanger, waiting for my daughter to wake up from her nap so she could try it on.

Project 1 on the Hanger = WIN!
And now the true test - does my daughter like it? What do you think?


Project 1 as judged by the model herself = FAIL.
But at least she doesn't want it to go in the trash. I interviewed her to get her opinion on this new dress. Sigh... I couldn't even get her to say "Good try Mommy!" LOL!
So what went wrong?
I measured 23 inches for length and it ended up being 23-1/2" long. Too long for her taste, but I kept reminding her she wouldn't have to wear bloomers under it. The fact that it was 19" wide was really the problem - she felt like she was wearing a pillowcase, and it didn't feel cute. I did ask her if she wanted me to give it away. At first she said she wanted me to give it to Abby (our goddaughter) because she is a bigger girl. Then she said she wanted to keep it in her room until she was bigger. So maybe it's not a TOTAL fail after all. Or maybe she saw my face sink when she started crying with it on and is compassionnate enough already that she doesn't want to hurt my feelings... stay tuned. We'll only know for sure next year when I try to get her to try it on again!
So there you have it. My first experience. Everything I did was based on my memory of directions from this YouTube video and other web-based instructions. I recommend you follow the YouTube video for a more satisfied customer than my daughter!
Say, It Ain't Sew Easy
I started this blog the first day that I started to learn to sew on my new sewing machine (thanks Mom!). I'm a total novice, as you will soon find out if you are actually reading this blog. But I also realize it's super easy to get discouraged and quit because, well, learning to sew "ain't sew easy." Hence then name, Say it ain't "sew" became, "Say, It Ain't Sew Easy."
Subscribe to:
Posts (Atom)